AndroidのGoogleMapsAPIを試してみた
Android の Google Maps API v2 を試してみました。
API Key の取得
Google のサービスを使うときには付き物のサービスの有効化と API Key を取得します。
プロジェクトの作成の説明ははしょります。
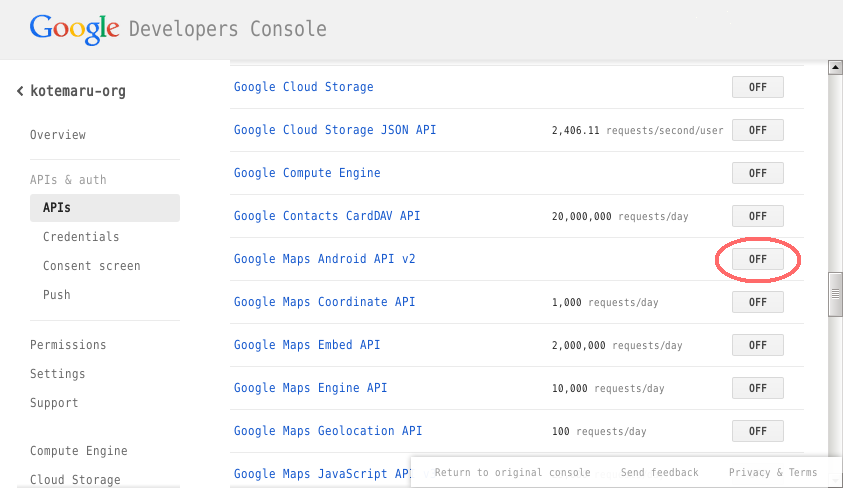
プロジェクトに入ってメニューから「APIs」を選択し「Google maps Android API v2」を有効にします。
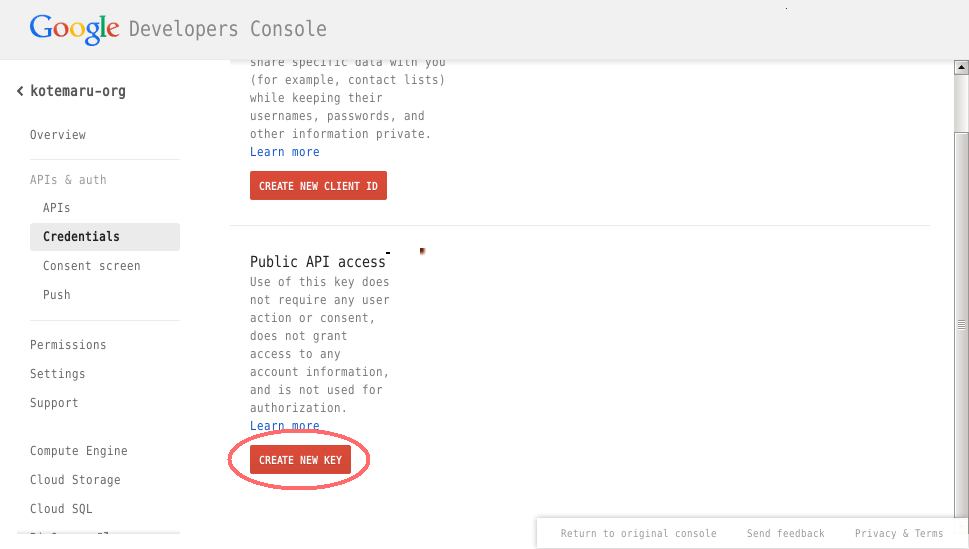
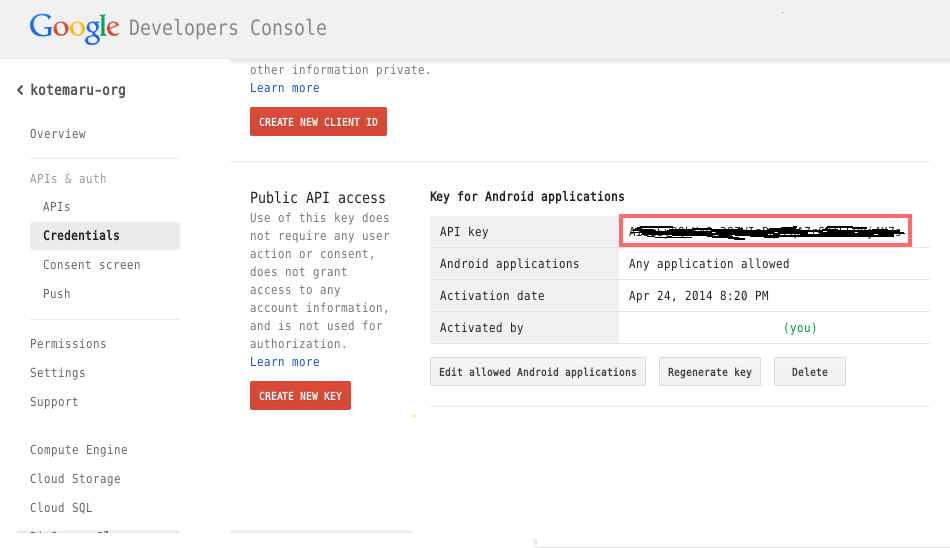
メニューから「Cedentails」を選択し「CREATE NEW KEY」をクリックします。
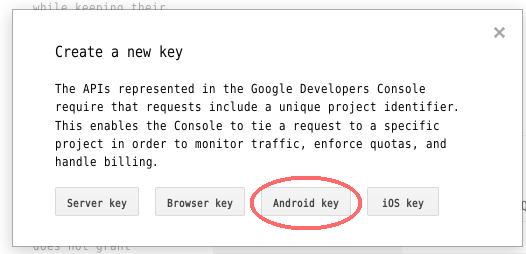
「Android Key」をクリックします。
テスト用なら fingerprint は空でも良いようです。
本番用はちゃんと記述しましょう。
「Create」をクリックすれば API Key が生成されます。
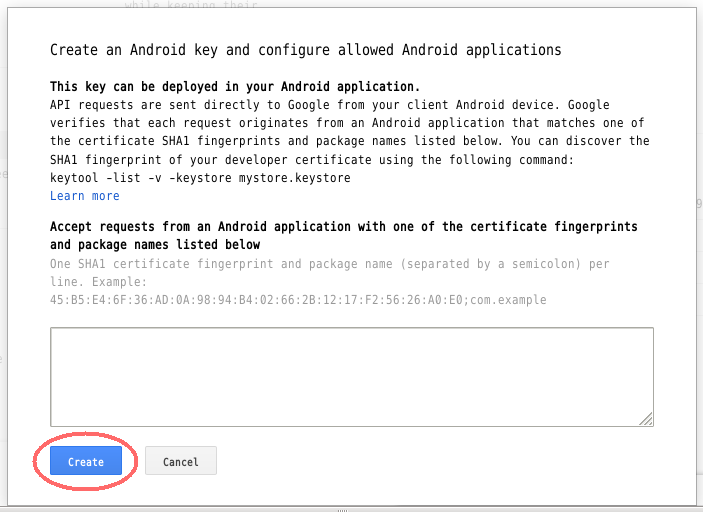
API Key をコピーして控えて置きます。
ライブラリの準備
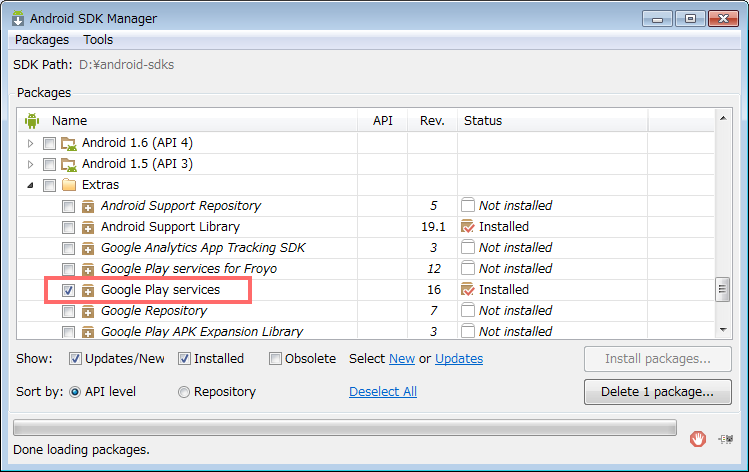
SDK Manager から extra の 「Google Play services」 をインストールします。
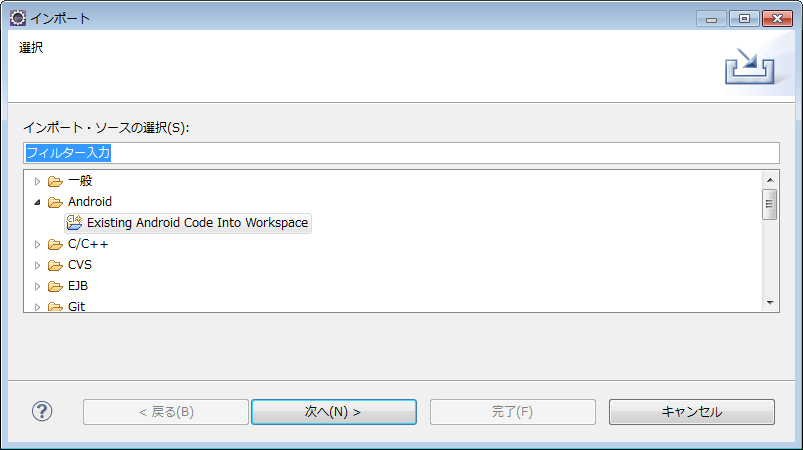
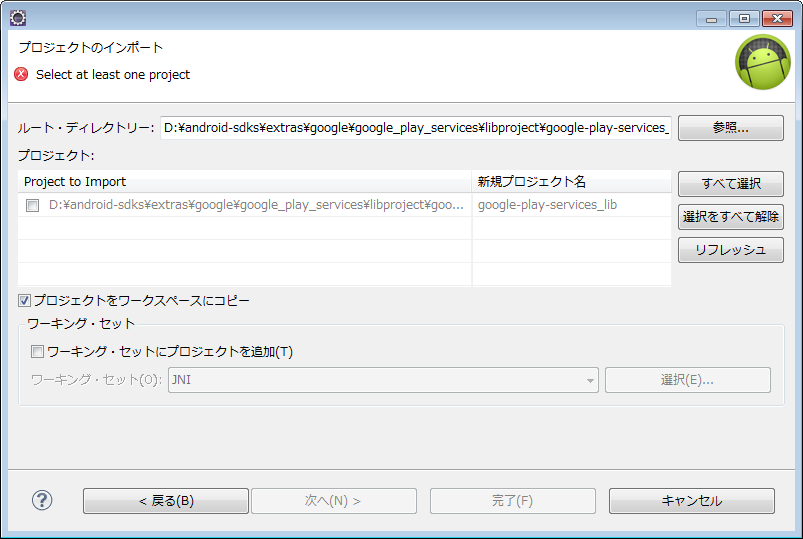
Google Play services を eclipse のプロジェクトにインポートします。
※ jar ファイルのみ持ってくると x86 環境で ClassNotFound が発生するようです。
インポート元は「Existing Android Code into workspace」を選択します。
ローカルファイルを選択しないようにしてください。
プロジェクトのディレクトリは結構深い所にあります。
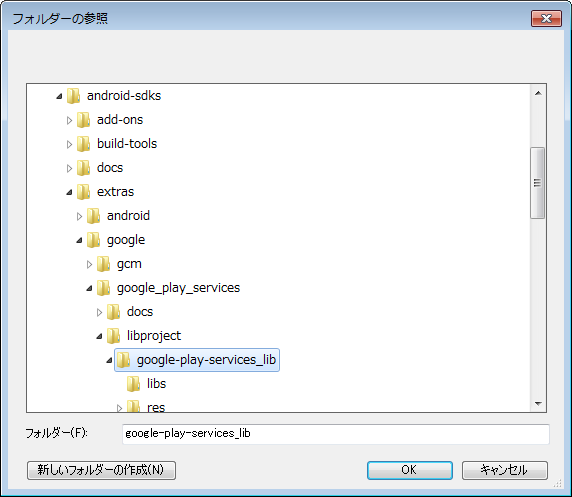
念のため workspace にコピーは有効にします。
開発プロジェクトのライブラリとして指定します。
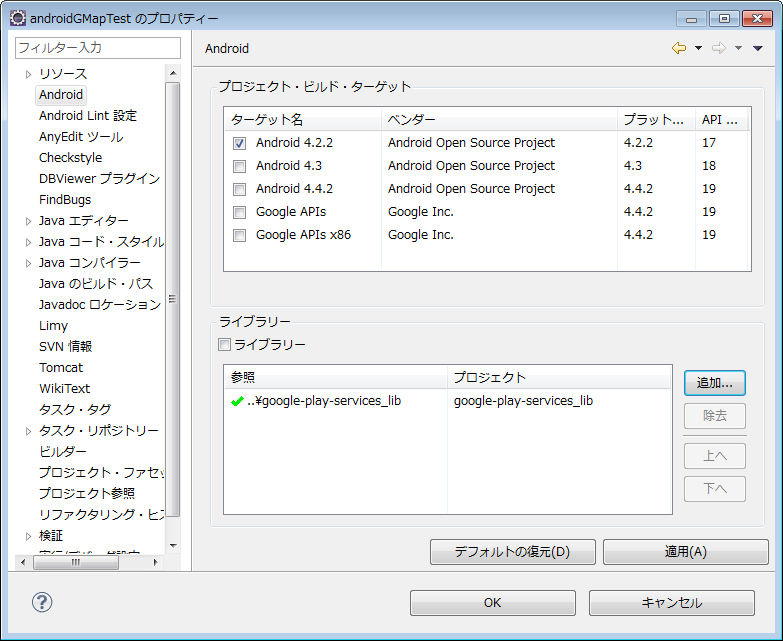
開発の準備完了です。
開発コード
公式のサンプルは ${android-sdks}\extras\google\googleplayservices\samples\maps に大量に有ります。
Manifest
パーミッションは記述してある物は基本的に全部必要です。
meta-data 2つは必須です。
API_KEY には先に取得した API Key を指定してください。
<?xml version="1.0" encoding="utf-8"?>
<manifest xmlns:android="http://schemas.android.com/apk/res/android"
    package="org.kotemaru.android.gmaptest"
    android:versionCode="1"
    android:versionName="1.0" >

    <uses-sdk android:minSdkVersion="8" android:targetSdkVersion="16" />

    <uses-permission android:name="android.permission.ACCESS_NETWORK_STATE" />
    <uses-permission android:name="android.permission.INTERNET" />
    <uses-permission android:name="com.google.android.providers.gsf.permission.READ_GSERVICES" />
    <!-- External storage for caching. -->
    <uses-permission android:name="android.permission.WRITE_EXTERNAL_STORAGE" />
    <!-- My Location -->
    <uses-permission android:name="android.permission.ACCESS_COARSE_LOCATION" />
    <uses-permission android:name="android.permission.ACCESS_FINE_LOCATION" />

    <application
        android:allowBackup="true"
        android:icon="@drawable/ic_launcher"
        android:label="@string/app_name"
        android:theme="@style/AppTheme" >
        <meta-data
            android:name="com.google.android.maps.v2.API_KEY"
            android:value="{Google Developer Console で取得したAPI Key}" />
        <meta-data
            android:name="com.google.android.gms.version"
            android:value="@integer/google_play_services_version" />

        <activity
            android:name="org.kotemaru.android.gmaptest.MainActivity"
            android:label="@string/app_name" >
            <intent-filter>
                <action android:name="android.intent.action.MAIN" />
                <category android:name="android.intent.category.LAUNCHER" />
            </intent-filter>
        </activity>
    </application>
</manifest>
レイアウト
基本的に SupportMapFragment を使うようです。
GMapView を使うサンプルも有りましたが面倒なだけでした。
<RelativeLayout xmlns:android="http://schemas.android.com/apk/res/android"
    xmlns:tools="http://schemas.android.com/tools"
    android:layout_width="match_parent"
    android:layout_height="match_parent" >

    <fragment
        android:id="@+id/map"
        android:layout_width="match_parent"
        android:layout_height="match_parent"
        class="com.google.android.gms.maps.SupportMapFragment" />

</RelativeLayout>
ソース
最低限必要となりそうな 初期位置の設定、GPS連動、マーカーの設置 をやってみました。
package org.kotemaru.android.gmaptest;

import android.location.Location;
import android.os.Bundle;
import android.support.v4.app.FragmentActivity;
import android.widget.Toast;

import com.google.android.gms.common.ConnectionResult;
import com.google.android.gms.common.GooglePlayServicesClient.ConnectionCallbacks;
import com.google.android.gms.common.GooglePlayServicesClient.OnConnectionFailedListener;
import com.google.android.gms.location.LocationClient;
import com.google.android.gms.location.LocationListener;
import com.google.android.gms.location.LocationRequest;
import com.google.android.gms.maps.CameraUpdateFactory;
import com.google.android.gms.maps.GoogleMap;
import com.google.android.gms.maps.GoogleMap.OnMarkerClickListener;
import com.google.android.gms.maps.SupportMapFragment;
import com.google.android.gms.maps.model.LatLng;
import com.google.android.gms.maps.model.Marker;
import com.google.android.gms.maps.model.MarkerOptions;

public class MainActivity extends FragmentActivity {
    private GoogleMap gMap;
    private LocationClient locationClient;

    @Override
    protected void onCreate(Bundle savedInstanceState) {
        super.onCreate(savedInstanceState);
        setContentView(R.layout.activity_main);
        setUpMapIfNeeded(); // サンプルに従っているがここでも呼ぶ意味は良く分からない。
    }

    @Override
    protected void onResume() {
        super.onResume();
        setUpMapIfNeeded();
        setUpLocation(true);
    }

    // ---------------------------------------------------------------------
    // マップ初期化処理
    private void setUpMapIfNeeded() {
        if (gMap == null) {
            gMap = ((SupportMapFragment) getSupportFragmentManager().findFragmentById(R.id.map))
                    .getMap();
            if (gMap != null) {
                setUpMap();
            }
        }
    }
    private void setUpMap() {
        // 初期座標、拡大率設定
        LatLng latLng = new LatLng(35.684699, 139.753897);
        float zoom = 13; // 2.0~21.0
        gMap.moveCamera(CameraUpdateFactory.newLatLngZoom(latLng, zoom));

        // マーカー設置
        gMap.addMarker(new MarkerOptions().position(latLng).title("皇居"));
        gMap.setOnMarkerClickListener(new OnMarkerClickListener() {
            public boolean onMarkerClick(Marker marker) {
                // この marker は保存するとリークすると思われる。
                String msg = "Marker onClick:" + marker.getTitle();
                Toast.makeText(MainActivity.this, msg, Toast.LENGTH_LONG).show();
                return false;
            }
        });
    }

    // --------------------------------------------------------------------------------
    // 以下、GPS連動の設定。
    private void setUpLocation(boolean isManual) {
        if (isManual) {
            // 画面右上にGPSボタンが表示される。
            // タップすると現在地への移動までかってにやってくれる。
            gMap.setMyLocationEnabled(true);
        } else {
            // 現在地を定期的に取得する設定。
            if (locationClient == null) {
                locationClient = new LocationClient(
                        getApplicationContext(),
                        connectionCallbacks,
                        onConnectionFailedListener);
                locationClient.connect();
            }
        }
    }

    ConnectionCallbacks connectionCallbacks = new ConnectionCallbacks() {
        private final LocationRequest locationRequest = LocationRequest.create()
                .setInterval(5000)         // 5 seconds
                .setFastestInterval(5000)
                .setPriority(LocationRequest.PRIORITY_HIGH_ACCURACY);

        @Override
        public void onConnected(Bundle arg0) {
            locationClient.requestLocationUpdates(locationRequest, locationListener);
        }
        @Override
        public void onDisconnected() {
            // nop.
        }
    };
    OnConnectionFailedListener onConnectionFailedListener = new OnConnectionFailedListener() {
        @Override
        public void onConnectionFailed(ConnectionResult connectionResult) {
            // nop.;
        }
    };
    LocationListener locationListener = new LocationListener() {
        @Override
        public void onLocationChanged(Location location) {
            LatLng latLng = new LatLng(location.getLatitude(), location.getLongitude());
            float zoom = 20;
            gMap.animateCamera(CameraUpdateFactory.newLatLngZoom(latLng, zoom));
        }
    };
}
GPS連動の所以外はかなり簡単なコードで済んでいます。
マーカーの扱い方がちょっと特殊な感じですがおそらく画面上に表示されていない マーカーをオンメモリにさせない為と思われます。 出典を見失いましたが Marker インスタンスをハンドラの外で使うなと言う記述をどこかで見ました。
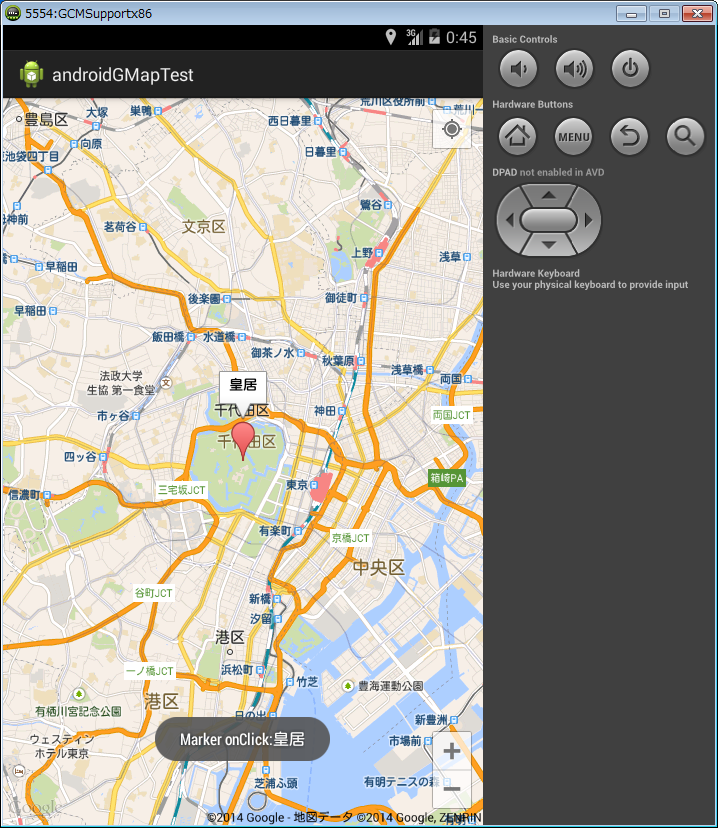
実行結果
実機でGPSの動作も確認できています。
感想
JavaScript でやった時とだいぶ違う感じ。(JavaScriptはv3だったけど)
最初 MarkerOptions と Marker の関係が理解できなくて悩んだ。 マーカーに限らずレイヤーの表示は全てこの形態になる様子。
Google Map は機能が膨大なのでAPIを全部把握して置くのは無理そうw