AndroidとPCのBluetooth接続のサンプル
そういえば Bluetooth ってやったとこが無いので Android と PC の接続を試してみることにした。
Bluetooth プログラミングの基礎知識
これが分かってなくてちょっと苦労しました。
- 各Bluetooth機器は固有のMACアドレスを持っている。
- 6byte。NICのMACアドレスとは別採番。
- Bluetooth機器内の各サービスは固有のUUIDを持っている。
- 規定のUUID一覧
- 独自プロトコルの場合はツールで生成したUUIDで良い。
- サーバとクライアントが認識していれば良いので衝突とかは考えなくてよい。
- Bluetoothは非公開にできる。
- PCやAndroidはデフォルト非公開になっている。
- 非公開で有ってもペアリング済みなら接続できる。
- ペアリング未でも公開されていれば検索して接続できる。
android.bluetooth と JSR82
Java で Bluetooth を扱う場合には JSR82 という仕様が存在するのですが Android は独自の API を使います。
つまり、PC と Ancdoid で API を使い分ける必要があると言うことです。orz
#まぁUSBの時はJavaですら無かった訳ですが。
AndroidのAPIはいつもお世話になる「勝手に翻訳」さんのサイトに有ります。
JSR82 の使い方は整理されているところが見つからずexampleを見ながら対応しました。
JSR82 のオープンな実装は以下のプロジェクトが存在します。
現時点(2013/10)での正式リリース版は Win7/x64 に対応していません。
私は bluecore-2.1.1-SNAPSHOT.jar を使いました。
jar の中には DLL とかも入っています。
サーバ側の実装
PCをサーバ側とします。
このクラス1つだけで JSR82 の実装です。
ドキュメントが見つからず example を頼りに調べたので不正確かもしれません。
RfcommServer.java
- 重要なのは Connecror.open() だけで後の作りはほぼソケットを使ったサーバと同じです。
- 引数のURL
- プロトコル:ベースのプロトコルを指定。RFCOMMの場合は「btspp:」。一覧表はどこに有るか不明。
- MACアドレス:サーバ側は「localhost」に固定。
- UUID:適当にツールで生成します。
- サービスをデバイスに登録して置くとクライアントがサービス一覧でUUIDを取得できます。
- Androidはペアリング済みのデバイスで無いとサービス(UUID)を取得できませんでした。
- 登録しなくでも接続は可能な様子。
- 一応、スレッドで同時接続可能にしてあるが実際にできるかは未確認です。
package org.kotemaru.sample.bluetooth;

import java.io.IOException;
import java.io.InputStream;
import java.io.OutputStream;
import java.util.Date;

import javax.bluetooth.LocalDevice;
import javax.bluetooth.ServiceRecord;
import javax.microedition.io.Connector;
import javax.microedition.io.StreamConnection;
import javax.microedition.io.StreamConnectionNotifier;

/**
 * 英大文字変換エコーバック Bluetooth サーバ。
 */
public class RfcommServer {
    /**
     * UUIDは独自プロトコルのサービスの場合は固有に生成する。
     * - 各種ツールで生成する。(ほぼ乱数)
     * - 注:このまま使わないように。
     */
    static final String serverUUID = "11111111111111111111111111111123";

    private StreamConnectionNotifier server = null;

    public RfcommServer() throws IOException {
        // RFCOMMベースのサーバの開始。
        // - btspp:は PRCOMM 用なのでベースプロトコルによって変わる。
        server = (StreamConnectionNotifier) Connector.open(
                "btspp://localhost:" + serverUUID,
                Connector.READ_WRITE, true
        );
        // ローカルデバイスにサービスを登録。必須ではない。
        ServiceRecord record = LocalDevice.getLocalDevice().getRecord(server);
        LocalDevice.getLocalDevice().updateRecord(record);
    }

    /**
     * クライアントからの接続待ち。
     * @return 接続されたたセッションを返す。
     */
    public Session accept() throws IOException {
        log("Accept");
        StreamConnection channel = server.acceptAndOpen();
        log("Connect");
        return new Session(channel);
    }
    public void dispose() {
        log("Dispose");
        if (server  != null) try {server.close();} catch (Exception e) {/*ignore*/}
    }

    /**
     * セッション。
     * - 並列にセッションを晴れるかは試していない。
     * - 基本的に Socket と同じ。
     */
    static class Session implements Runnable {
        private StreamConnection channel = null;
        private InputStream btIn = null;
        private OutputStream btOut = null;

        public Session(StreamConnection channel) throws IOException {
            this.channel = channel;
            this.btIn = channel.openInputStream();
            this.btOut = channel.openOutputStream();
        }

        /**
         * 英小文字の受信データを英大文字にしてエコーバックする。
         * - 入力が空なら終了。
         */
        public void run() {
            try {
                byte[] buff = new byte[512];
                int n = 0;
                while ((n = btIn.read(buff)) > 0) {
                    String data = new String(buff, 0, n);
                    log("Receive:"+data);
                    btOut.write(data.toUpperCase().getBytes());
                    btOut.flush();
                }
            } catch (Throwable t) {
                t.printStackTrace();
            } finally {
                close();
            }
        }
        public void close() {
            log("Session Close");
            if (btIn    != null) try {btIn.close();} catch (Exception e) {/*ignore*/}
            if (btOut   != null) try {btOut.close();} catch (Exception e) {/*ignore*/}
            if (channel != null) try {channel.close();} catch (Exception e) {/*ignore*/}
        }
    }

    //------------------------------------------------------
    public static void main(String[] args) throws Exception {
        RfcommServer server = new RfcommServer();
        while (true) {
            Session session = server.accept();
            new Thread(session).start();
        }
        //server.dispose();
    }
    private static void log(String msg) {
        System.out.println("["+(new Date()) + "] " + msg);
    }
}
クライアント側の実装
Androidがクライアント側になります。
今回はペアリング済みのデバイスとの接続なのでデバイスの検索はしません。
検索はBluetooth実装の肝だったりするのですが以下の理由からはしょりました。
- アプリで実装しても設定画面のペアリング処理とほぼ同じになる。
- AndroidからPCを検索するにはPC側を一時的に公開設定にする必要があり接続毎は非実用的。
- PCを公開しっ放しはセキュリティ上の問題から不可。
ManifestAndroid.xml
デフォルトにパーミッションを追加しただけです。
<uses-permission android:name="android.permission.BLUETOOTH"></uses-permission>
<uses-permission android:name="android.permission.BLUETOOTH_ADMIN"></uses-permission>
ADMINは今回は使っていませんがデバイスの検索で必要になるので入れといた方が良いです。
MainActivity.java
- Blurtooth の機能は BluetoothTask.java に実装しているので BluetoothTask を呼んでいる所以外は普通のActivityです。
package org.kotemaru.android.sample.bluetooth;
import java.util.Set;
import android.os.Bundle;
import android.app.Activity;
import android.app.AlertDialog;
import android.app.Dialog;
import android.app.ProgressDialog;
import android.bluetooth.BluetoothDevice;
import android.content.DialogInterface;
import android.content.Intent;
import android.view.View;
import android.view.View.OnClickListener;
import android.widget.Button;
import android.widget.EditText;
public class MainActivity extends Activity {
private final static int DEVICES_DIALOG = 1;
private final static int ERROR_DIALOG = 2;
private BluetoothTask bluetoothTask = new BluetoothTask(this);
private ProgressDialog waitDialog;
private EditText editText1;
private EditText editText2;
private String errorMessage = "";
@Override
protected void onCreate(Bundle savedInstanceState) {
super.onCreate(savedInstanceState);
setContentView(R.layout.activity_main);
editText1 = (EditText) findViewById(R.id.editText1);
editText2 = (EditText) findViewById(R.id.editText2);
Button sendBtn = (Button) findViewById(R.id.sendBtn);
sendBtn.setOnClickListener(new OnClickListener() {
@Override
public void onClick(View v) {
String msg = editText1.getText().toString();
bluetoothTask.doSend(msg);
}
});
Button resetBtn = (Button) findViewById(R.id.resetBtn);
resetBtn.setOnClickListener(new OnClickListener() {
@Override
public void onClick(View v) {
restart();
}
});
}
@SuppressWarnings("deprecation")
@Override
protected void onResume() {
super.onResume();
// Bluetooth初期化
bluetoothTask.init();
// ペアリング済みデバイスの一覧を表示してユーザに選ばせる。
showDialog(DEVICES_DIALOG);
}
@Override
protected void onDestroy() {
bluetoothTask.doClose();
super.onDestroy();
}
public void doSetResultText(String text) {
editText2.setText(text);
}
protected void restart() {
Intent intent = this.getIntent();
this.finish();
this.startActivity(intent);
}
//----------------------------------------------------------------
// 以下、ダイアログ関連
@Override
protected Dialog onCreateDialog(int id) {
if (id == DEVICES_DIALOG) return createDevicesDialog();
if (id == ERROR_DIALOG) return createErrorDialog();
return null;
}
@SuppressWarnings("deprecation")
@Override
protected void onPrepareDialog(int id, Dialog dialog) {
if (id == ERROR_DIALOG) {
((AlertDialog) dialog).setMessage(errorMessage);
}
super.onPrepareDialog(id, dialog);
}
public Dialog createDevicesDialog() {
AlertDialog.Builder alertDialogBuilder = new AlertDialog.Builder(this);
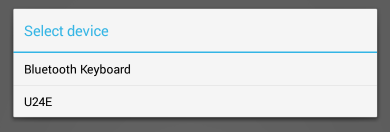
alertDialogBuilder.setTitle("Select device");
// ペアリング済みデバイスをダイアログのリストに設定する。
Set<BluetoothDevice> pairedDevices = bluetoothTask.getPairedDevices();
final BluetoothDevice[] devices = pairedDevices.toArray(new BluetoothDevice[0]);
String[] items = new String[devices.length];
for (int i=0;i<devices.length;i++) {
items[i] = devices[i].getName();
}
alertDialogBuilder.setItems(items, new DialogInterface.OnClickListener() {
@Override
public void onClick(DialogInterface dialog, int which) {
dialog.dismiss();
// 選択されたデバイスを通知する。そのまま接続開始。
bluetoothTask.doConnect(devices[which]);
}
});
alertDialogBuilder.setCancelable(false);
return alertDialogBuilder.create();
}
@SuppressWarnings("deprecation")
public void errorDialog(String msg) {
if (this.isFinishing()) return;
this.errorMessage = msg;
this.showDialog(ERROR_DIALOG);
}
public Dialog createErrorDialog() {
AlertDialog.Builder alertDialogBuilder = new AlertDialog.Builder(this);
alertDialogBuilder.setTitle("Error");
alertDialogBuilder.setMessage("");
alertDialogBuilder.setPositiveButton("Exit", new DialogInterface.OnClickListener() {
@Override
public void onClick(DialogInterface dialog, int which) {
dialog.dismiss();
finish();
}
});
return alertDialogBuilder.create();
}
public void showWaitDialog(String msg) {
if (waitDialog == null) {
waitDialog = new ProgressDialog(this);
}
waitDialog.setMessage(msg);
waitDialog.setProgressStyle(ProgressDialog.STYLE_SPINNER);
waitDialog.show();
}
public void hideWaitDialog() {
waitDialog.dismiss();
}
}
BluetoothTask.java
Bluetoothのメイン処理です。
- デバイス検索を行わないBluetoothの最小構成の手順はこれだけです。
1. bluetoothAdapter = BluetoothAdapter.getDefaultAdapter();
2. Setdevices = bluetoothAdapter.getBondedDevices();
3. bluetoothDevice = devicesから選択;
4. bluetoothSocket = bluetoothDevice.createRfcommSocketToServiceRecord(APP_UUID);
5. bluetoothSocket.connect();
6. btIn = bluetoothSocket.getInputStream();
7. btOut = bluetoothSocket.getOutputStream();
8. btIn.read()/btOut.write()
9. bluetoothSocket.close();
- ただし、connect()以降は通信が発生するためすべて非同期処理とする必要があります。
- Bluetoothの使用許可が無い場合にユーザに許可を求める処理ははしょってます。
package org.kotemaru.android.sample.bluetooth;

import java.io.IOException;
import java.io.InputStream;
import java.io.OutputStream;
import java.util.Set;
import java.util.UUID;

import android.os.AsyncTask;
import android.os.ParcelUuid;
import android.util.Log;
import android.annotation.SuppressLint;
import android.bluetooth.BluetoothAdapter;
import android.bluetooth.BluetoothDevice;
import android.bluetooth.BluetoothSocket;
import android.content.BroadcastReceiver;
import android.content.Context;
import android.content.Intent;
import android.content.IntentFilter;

public class BluetoothTask {
    private static final String TAG = "BluetoothTask";

    /**
     * UUIDはサーバと一致している必要がある。
     * - 独自サービスのUUIDはツールで生成する。(ほぼ乱数)
     * - 注:このまま使わないように。
     */
    private static final UUID APP_UUID = UUID.fromString("11111111-1111-1111-1111-111111111123");

    private MainActivity activity;
    private BluetoothAdapter bluetoothAdapter;
    private BluetoothDevice bluetoothDevice = null;
    private BluetoothSocket bluetoothSocket;
    private InputStream btIn;
    private OutputStream btOut;

    public BluetoothTask(MainActivity activity) {
        this.activity = activity;
    }

    /**
     * Bluetoothの初期化。
     */
    public void init() {
        // BTアダプタ取得。取れなければBT未実装デバイス。
        bluetoothAdapter = BluetoothAdapter.getDefaultAdapter();
        if (bluetoothAdapter == null) {
            activity.errorDialog("This device is not implement Bluetooth.");
            return;
        }
        // BTが設定で有効になっているかチェック。
        if (!bluetoothAdapter.isEnabled()) {
            // TODO: ユーザに許可を求める処理。
            activity.errorDialog("This device is disabled Bluetooth.");
            return;
        }
    }
    /**
     * @return ペアリング済みのデバイス一覧を返す。デバイス選択ダイアログ用。
     */
    public Set<BluetoothDevice> getPairedDevices() {
        return bluetoothAdapter.getBondedDevices();
    }

    /**
     * 非同期で指定されたデバイスの接続を開始する。
     * - 選択ダイアログから選択されたデバイスを設定される。
     * @param device 選択デバイス
     */
    public void doConnect(BluetoothDevice device) {
        bluetoothDevice = device;
        try {
            bluetoothSocket = bluetoothDevice.createRfcommSocketToServiceRecord(APP_UUID);
            new ConnectTask().execute();
        } catch (IOException e) {
            Log.e(TAG,e.toString(),e);
            activity.errorDialog(e.toString());
        }
    }

    /**
     * 非同期でBluetoothの接続を閉じる。
     */
    public void doClose() {
        new CloseTask().execute();
    }

    /**
     * 非同期でメッセージの送受信を行う。
     * @param msg 送信メッセージ.
     */
    public void doSend(String msg) {
        new SendTask().execute(msg);
    }

    /**
     * Bluetoothと接続を開始する非同期タスク。
     * - 時間がかかる場合があるのでProcessDialogを表示する。
     * - 双方向のストリームを開くところまで。
     */
    private class ConnectTask extends AsyncTask<Void, Void, Object> {
        @Override
        protected void onPreExecute() {
            activity.showWaitDialog("Connect Bluetooth Device.");
        }

        @Override
        protected Object doInBackground(Void... params) {
            try {
                bluetoothSocket.connect();
                btIn = bluetoothSocket.getInputStream();
                btOut = bluetoothSocket.getOutputStream();
            } catch (Throwable t) {
                doClose();
                return t;
            }
            return null;
        }

        @Override
        protected void onPostExecute(Object result) {
            if (result instanceof Throwable) {
                Log.e(TAG,result.toString(),(Throwable)result);
                activity.errorDialog(result.toString());
            } else {
                activity.hideWaitDialog();
            }
        }
    }

    /**
     * Bluetoothと接続を終了する非同期タスク。
     * - 不要かも知れないが念のため非同期にしている。
     */
    private class CloseTask extends AsyncTask<Void, Void, Object> {
        @Override
        protected Object doInBackground(Void... params) {
            try {
                try{btOut.close();}catch(Throwable t){/*ignore*/}
                try{btIn.close();}catch(Throwable t){/*ignore*/}
                bluetoothSocket.close();
            } catch (Throwable t) {
                return t;
            }
            return null;
        }

        @Override
        protected void onPostExecute(Object result) {
            if (result instanceof Throwable) {
                Log.e(TAG,result.toString(),(Throwable)result);
                activity.errorDialog(result.toString());
            }
        }
    }

    /**
     * サーバとメッセージの送受信を行う非同期タスク。
     * - 英小文字の文字列を送ると英大文字で戻ってくる。
     * - 戻ってきた文字列を下段のTextViewに反映する。
     */
    private class SendTask extends AsyncTask<String, Void, Object> {
        @Override
        protected Object doInBackground(String... params) {
            try {
                btOut.write(params[0].getBytes());
                btOut.flush();

                byte[] buff = new byte[512];
                int len = btIn.read(buff); // TODO:ループして読み込み

                return new String(buff, 0, len);
            } catch (Throwable t) {
                doClose();
                return t;
            }
        }

        @Override
        protected void onPostExecute(Object result) {
            if (result instanceof Exception) {
                Log.e(TAG,result.toString(),(Throwable)result);
                activity.errorDialog(result.toString());
            } else {
                // 結果を画面に反映。
                activity.doSetResultText(result.toString());
            }
        }
    }
}
実行
ペアリング
まずPCとAndroidのペアリングが必要です。1回やればOKです。
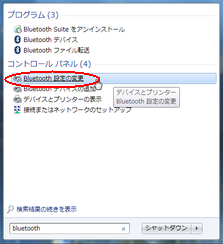
(1) PCの Bluetoothの設定で「このコンピュータの検出を許可する」に設定します。
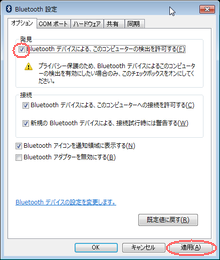
- 注:ペアリング終了後、必ず非公開に戻してください。
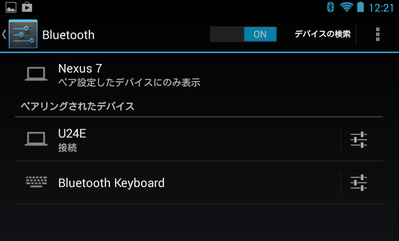
(2) AndroidのBluetoothの設定で「デバイス検出」をタップして暫く待つとPCが検出されるのでタップします。
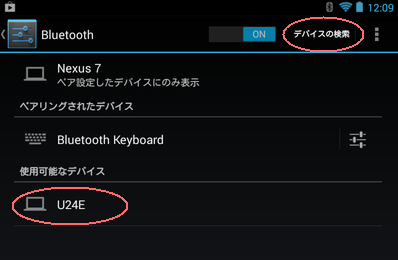
- U24E は私のPCに設定した名前です。当然、お使いのPCの名前が表示されます。
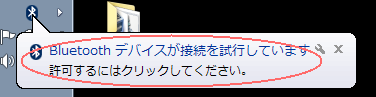
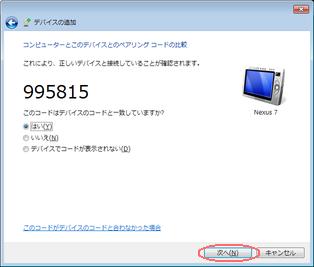
(3) PCに許可を求めるポップアップが出るのでクリックします。
(4) 確認画面が出るので「次へ」をクリックします。
(5) Androidにダイアログが出ているので「ペアを設定する」をタップします。
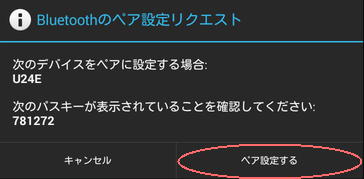
- ※パスキーは本来(4)の画面と一致します。キャプチャの都合です。
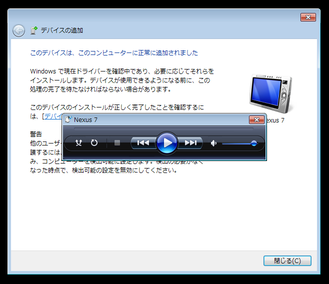
(6) PCとAndroidでそれぞれデバイスが認識されていればOKです。
サーバの起動
RfcommServer.java を eclipse から実行します。 Consoleのログに Accept と出ていればOKです。
クライアント実行
アプリを起動するとペアリング済みデバイスの一覧がでるのでPCをタップします。
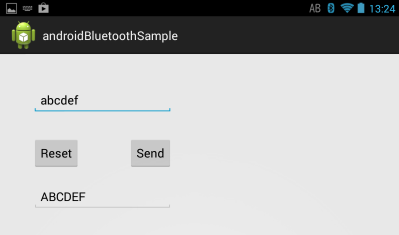
上の TextField に英小文字を入れて「Send」をタップすると下の TextField に英大文字でエコーバックされればOKです。
雑感
MACアドレスをIPアドレス、UUIDをポート番号と考えれば殆どソケットと同じです。 RFCOMM以外のプロトコルを使うと色々有そうですけど。
調査中に見つけた高木先生の記事がおもしろかった。
携帯端末の Bluetooth を公開設定にしていると行動追跡されちゃうよ、と言うお話で実際に山手線で調査したもの。
Androidは今回の調査で一時的にしか公開状態に出来ない事が分かったので安心。 ノートPCは設定画面に注意書きが有るけど設定の戻し忘れに注意かな。